

If you are a Windows 10 user, you may need to take screenshots of your screen for various reasons.
Whether you want to capture an error message, save an image, or share something with others, taking screenshots is a useful feature.
In this article, we will guide you on how to screenshot Windows 10 with some of the easiest and most effective methods.
How to Screenshot Windows 10? Step-by-Step Guide
Using Print Screen Key
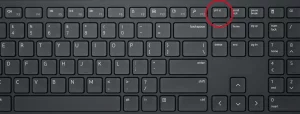
The Print Screen (PrtScn) key is a quick way to take a screenshot of your entire screen.
- Make sure the content you wish to capture is visible on your screen.
- Press the Print Screen (PrtScn) key on your keyboard. This will capture a screenshot of your entire screen.
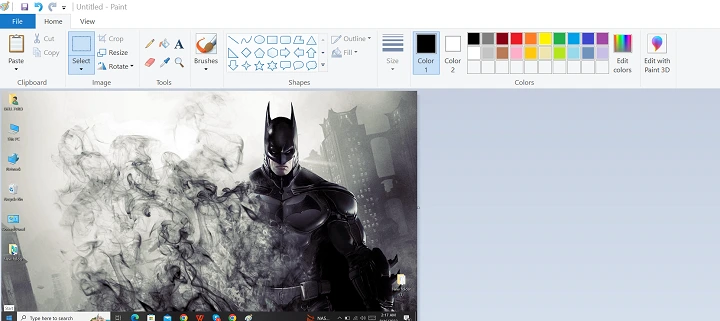
- Open the Paint application or any other image editing software.
- Press Ctrl + V or right-click and select Paste to paste the screenshot you just took.
- Save the image in your desired location.
Using Snipping Tool
Snipping Tool is a built-in screenshot tool that allows you to capture a specific area of your screen.
- Open the Snipping Tool application. You can find it by typing “Snipping Tool” in the Windows search bar.
- Click on the New button to start a new snip.
- Click and drag your cursor to select the area you want to capture.
- Once you release the mouse button, the snip will be saved in the Snipping Tool window.
- Click on the Save Snip button to save the image in your desired location.
Using Snip & Sketch
Snip & Sketch is a newer screenshot tool that replaces the Snipping Tool in Windows 10.
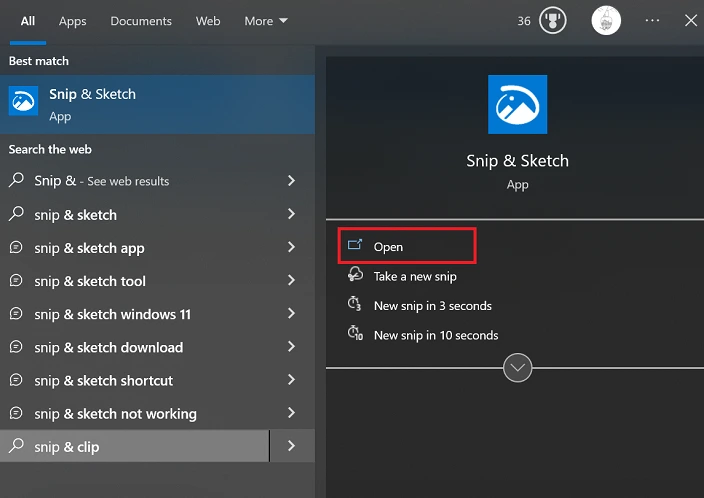
- Open the Snip & Sketch application. You can find it by typing “Snip & Sketch” in the Windows search bar.
- Click on the New button to start a new snip.

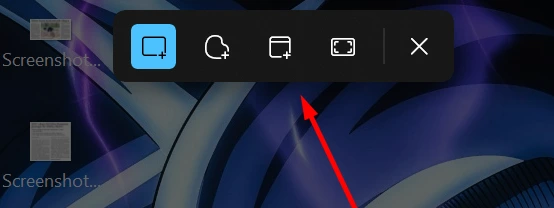
- Select the type of snip you want to take, such as Free-form Snip, Rectangular Snip, Window Snip, or Full-screen Snip.
- Click and drag your cursor to select the area you want to capture.
- Once you release the mouse button, the snip will be saved in the Snip & Sketch window.
- Click on the Save button to save the image in your desired location.
Using Third Party Tools
There are many third-party tools available that can make taking screenshots on Windows 10 even easier. Some popular options include:
Lightshot: This is a lightweight screenshot tool that allows you to capture images and annotate them with text and shapes.
It’s a great option for quick and easy screenshots.
Snagit: This is a powerful screenshot tool that allows you to capture images and videos from your screen.
It has a variety of editing tools and sharing options, making it a great choice for professionals.
Greenshot: This is another lightweight screenshot tool that allows you to capture images and annotate them with text and shapes.
That’s it! You can now easily capture screenshots on your Windows 10 PC using any of these methods.
Advanced Screenshot Techniques
Screenshot of Active Window
Sometimes you may want to take a screenshot of only the active window on your screen, rather than the entire screen.
Here’s how you can do it:
- Click on the window you want to capture.
- Hold down the Alt key and press the Print Screen (PrtScn) key.
- Open an image editor like Paint or Photoshop.
- Press Ctrl + V or right-click and select “Paste” to paste the screenshot into the editor.
Delayed Screenshot
If you need to take a screenshot of a menu or a tooltip that disappears quickly, you can use the delayed screenshot feature in Windows 10.
This feature allows you to set a delay of up to 5 seconds before the screenshot is taken, giving you time to set up the shot.
Here’s how to use it:
- Press the Windows key + G to open the Game Bar.
- Click on the camera icon to take a screenshot.
- Click on the “Delay” dropdown menu and select the desired delay time.
- Click on the “Take screenshot” button.
The screenshot will be saved to the default location or the location you specified in the settings.
Managing Your Screenshots
Taking a screenshot on Windows 10 is easy, but managing your screenshots can be a bit more challenging.
In this section, we’ll cover how to locate and edit your screenshots.
Locating Your Screenshots
- Windows saves your screenshots to the “Screenshots” folder in your “Pictures” folder.
- To access this folder, open File Explorer and navigate to Pictures >Screenshots.
- You can also search for Screenshots in the Start menu.
- If you want to change the default location where Windows saves your screenshots.
- You can do so by going to Settings > System > Screenshots.
Here, you can choose a different folder to save your screenshots to.
Editing Your Screenshots
Once you’ve located your screenshots, you may want to edit them before sharing or using them.
Windows 10 includes several built-in tools for editing screenshots.
Editing with Paint
The simplest way to edit your screenshots is to use the built-in Paint app.
- To open Paint, search for it in the Start menu.
- Once you have Paint open, you can open your screenshot by going to File > Open and selecting your screenshot.
- In Paint, you can crop, resize, and annotate your screenshot.
Editing with Snip & Sketch
- To open Snip & Sketch, press Windows + Shift + S.
- This will bring up a menu that allows you to select the type of screenshot you want to take.
- Once you’ve taken your screenshot, it will open in Snip & Sketch.
- In Snip & Sketch, you can crop, resize, and annotate your screenshot.
- To crop your screenshot, select the Crop tool and drag it over the area you want to keep.
- To resize your screenshot, go to Resize in the Image menu.
- To annotate your screenshot, select the Pen tool and choose a color and pen size.
Editing with Third-Party Apps
If you need more advanced editing features, there are many third-party apps available for Windows 10.
Some popular options include Adobe Photoshop, GIMP, and Paint.NET.
These apps offer more advanced editing tools like layers, filters, and effects. However, they may be more complex to use than the built-in tools.
Read Also: How to Get Dark Mode on Snapchat?
Troubleshooting Common Issues
If you’re having trouble taking screenshots in Windows 10, don’t worry.
There are a few common issues that you may encounter, and we’re here to help you troubleshoot them.
Here are some solutions to the most common problems:
When the Screenshot is Not Working
If you press the Print Screen button, but nothing happens, there could be a few reasons why. Here are some things to try:
- Make sure that your keyboard has a Print Screen button. Some keyboards may have a different key for taking screenshots.
- Check if any other programs are running that could be interfering with the screenshot function. For example, some screenshot tools may conflict with the built-in Windows 10 screenshot feature.
- Restart your computer and try taking a screenshot again.
- If you’re still having trouble, try using a different method to take a screenshot. For example, you could use the Snipping Tool or the Game Bar.
When the Screenshot is Blurry
If your screenshots are coming out blurry or low-quality, there are a few things you can do to fix this:
- Make sure that the window or screen you want to capture is in focus and not blurry. If the window or screen is blurry, your screenshot will be too.
- Check your display settings and make sure that your resolution is set to the recommended level. If your resolution is too low, your screenshots may come out blurry.
- Try using a different method to take a screenshot. For example, you could use the Snipping Tool or the Game Bar, which may produce higher-quality screenshots.
Read Also: Is Alternate Watch Game Free?
Wrapping up
You now know how to take screenshots in Windows 10. Whether you need to capture your entire screen or just a specific region, there are multiple ways to do it quickly and easily.
The simplest method is to press the PrtScn key to capture your entire screen, which will save the screenshot to your Pictures folder.
Another option is to use the Windows+Shift+S shortcut to capture a specific region of your screen.
If you need more advanced options, you can use the Snipping Tool or the Snip & Sketch app to capture specific areas of your screen, annotate your screenshots, and save them in various file formats.